Virgin launched cruises for people that don’t cruise – Brilliant. This is a Project Plan Template for people that don’t do Project Planning
The backstory to this project plan template is simple. The gulf between the big projects and the everyday projects has always amazed me. The big projects that are company-wide, probably instigated by KPMG or one of the big consultancies, are managed with Gantt charts and the like. Our thinking is then to do the same with the everyday small team projects that we have.
The truth is that applying those processes would be over-engineering what we need. Our needs are to manage the bigger stuff better because it will improve our productivity. We just need a practical and simple project plan template with some guidelines to help us achieve what we need the project to make happen. This is that… Practical and everyday project management. The kind that will step-change our time management.
I created this template from 30 years in the FMCG world of get it done now and with a mindset of Ready, Fire, Aim. Getting it done, not perfectly, but doing it, learning, and improving as we go. Some might call this the agile approach.
An Overview of the Project Plan Template and How to Guide

There are two parts to successful everyday project management; the project plan template and the how-to guide. The first part is a simple A4 template and the second part – the how-to guide – ensures that you get the very best from it.
The reason you don’t do project planning at the moment is that when you think of project management your mind conjures up Gannt charts, gate & stage processes, PRINCE2 qualifications, big long Excel files, and something that moves very slowly. Well, it doesn’t need to be this way.
I’d like to think that what we do here is what Stelios did for budget flying. Took away the mystique and complexity of flying and turn it into, ‘Well, just print your ticket at home and bring it with you.’
Success full project management is about starting and then making your plan live and breathe. Many a great plan has been left on a dusty shelf because it was just too cumbersome to use. Don’t fall foul of this mistake. Action beats perfection every time.
Part One: The Template

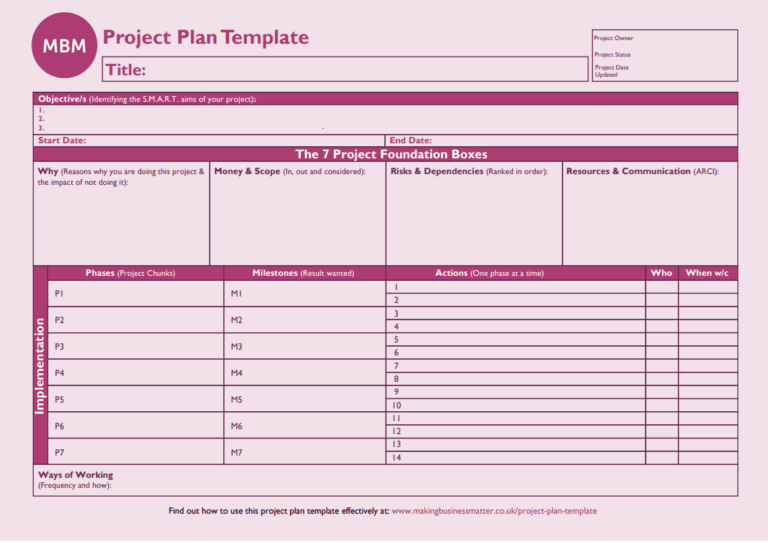
This is the project plan template. It is printable as an A4 page and is available in Word or as a pdf. Each part of the template has been designed to use the space effectively on a page. It has been updated, redesigned, and tinkered with for decades to get it to Goldilocks (Just right!).
Below is an image of the project plan template. You can download the template later on in this article, as a pdf or as a Word document.
- Use the document filename as follows: [<Your Project Title> – <Your initials><Date today>]. For example: ‘Project x – DAS 16-03-23.’ The filename is updated each time you amend the file because it helps people to know when it was updated at a glance.
- If you are using Dropbox or a similar storage system don’t use ‘&’ and other symbols in the filename because Dropbox doesn’t like symbols in filenames and has a strop!

Access your Free project plan template:
>> Editable Project Plan Template <<
Part Two: The How-to Guide for Using the Template

In this first section of the project plan, we call it ‘The 7 Project Foundation Boxes’ because getting these right creates an effective foundation for your project. The opposite is also true. Skipping these or doing them half-heartedly will cause you problems later on with your project.
Sticky Learning ® is 7 times more effective than 1-day training courses. Plus, you will get a Chain of Evidence proving your Return on Investment. Discover soft skills training that changes behaviours long term.

#1- Title Box:
- In the ‘Title’ white box (top left of the template) add the title of your project.
- Make the title clear enough to be understood and also balance this with great PR. Using the newspaper headline of the day can work well. I remember a Marketing Director who named his projects after The Sun’s (newspaper) headline that day. I think his best was ‘I wanna really, really, really wanna zig-a-zig, ah.’ The Spice Girls were popular at the time! With that said, see our Persuasion Techniques article for the power of 3 words – Number 46.
- You don’t need to use the whole white space for your title. The key is to make the project title memorable because people have a million demands on their time. Making it memorable and fun can sometimes be all you need to get their attention, and attention means effort. Then, attention means progress and progress means that you might achieve your project objectives.
- Include ‘(Quick Win)’ in the title if your project is chosen as a quick win project. Often, we are working with teams to help them to identify all their projects and then prioritise. You can find out more about this in the ‘How to Build a Category Strategy Plan‘.
#2- Project Owner/Status/Date Box:
- Name: In the top right of the template, put the project owner’s name, which is the same as the ‘accountable’ person’s name, in this box. See ‘Communication’ later in this article for ‘Accountable.’ This is the person that makes it all happen.
- Project Status: Include a status below the person’s name. This will change as you progress through the project. Every project has 3 key variables; time, money, and resource. Each of these 3 variables is rated on a simple RAG system (Red, Amber or Green). An example is: ‘GRA’. This means that the time given for the project to achieve its objective is on track (Green). The money given for the project is red, so not doing well. And the resources for the project are Amber, which is possibly ok. Simple project status of GRA, GGG, RRR, or any combination communicates instantly how the three key variables are doing. The order is time > money > resource – Or TMR.
- The ‘Project date Updated’ is the last date that this template was updated, e.g. 12-02-23. Plus, it should have the same date as the file name. See the document filename description written above.
#3- Objectives Box:
You can have one objective, two, or three objectives. Each objective needs to be SMART (Click the image below for a higher resolution):
- Specific
- Measurable
- Achievable
- Realistic
- Timely

A further explanation of S.M.A.R.T. can be found in this SMART article.
Many a project has eagerly started, only to revisit the objectives because one of the 5 letters of SMART was missed causing conflict and discussion once the project had begun. It is imperative that the obejctive/s tick each and every box of S.M.A.R.T.
#4- Start and End Dates Boxes:
- The start date is when the project was conceived.
- The end date is one month after the project has delivered its objective/s. This last month allows for a review of the project, i.e. if the project is due to start delivering its objectives in July, then August is the end date.
- Why review?
- Develop a continuing relationship with your stakeholders so that they are happy to come back to you next time.
- Earn credibility with your stakeholders because you demonstrate openness and encourage the same from them.
- Become more effective and efficient as a project manager.
- Help others in your project team to learn and perform more effectively in the future.
- Negotiate and ensure your needs on projects are met on future projects with your sponsor.
- Improve your project management process and share it with the whole team.
- End the project on a high note.
- Clear the air.
- Identify development needs for individuals.
- Say thank you to the team.
Foundation Section of the Project Plan Template

#1- Why Box:
Write 3 reasons why this project is going ahead. These are different to the objectives and might be written as more ‘problem based’, e.g. ‘The sales are very low and we need a solution to increase the sales.’ Include what would happen in this project did not go ahead. This is the reverse of why you are doing the project.
#2- Money & Scope (Boundaries) Box:
Each project will need money to support it. Write in this box the budget you will need for this project to achieve its objectives. For example, ‘1. Software £45k, 2. Agency £32k, and 3. Consultant £52k.
Include the scope in this section, e.g. ‘Scope in: xyz’ and ‘Scope out: abc.’ Consider ‘boxing in’ the project and protecting what is included in the project. For example, which products are in, which sites are in, and which processes are out? It may help to consider ‘scope creep’ and what someone may ask you to add in at a later date, which is better to ‘box this off’ now, rather than later. Scope ‘considered’ is also used for those projects that can not yet be classified as ‘in’ or ‘out.’
This is a tough part of project management and is usually skipped by most people. The best way to think of your project’s scope is to consider what will the stakeholders ask you to include in the future. Identifying those items now and including what your stakeholders ask whether those items are in or out, helps you to better manage this project without the added hassle of curve balls that create scope creep later on.
#3- Risks & Dependencies Box:
Risks Box
Identify up to 3 risks for this project. Consider why the project will fail. Then bullet-point the list of risks and add a number of 1 to 10 for how big a risk each risk is. ‘10’ shows that this will have a big impact on the project & is likely to happen, and ‘1’ shows that this will have a small impact on the project and is unlikely to happen. And for example; 10 – Uncompetitive on price, and 7 – Competition may steal our business.
After which, decide what to do with each risk using ‘MAT’ and add this to the box.
- Mitigate the risk – Can you reduce the risk?
- Accept the risk – Can you do nothing and accept the risk?
- Transfer the risk – Can you transfer the risk to another party?
Thus becoming, as an example, ’10 – Uncompetitive on price – (M) Seek £ support.’
Dependencies Box
Include up to 3 dependencies that the project’s success is dependent upon. For example, ‘Restructure happening successfully.’ Again, add a number from 1-10, to indicate how critical the dependency is for the project to achieve its objectives. 10 is critical and 1 is not. Becoming, as an example, ‘7 – Restructure happening successfully.’
For both boxes, the number is always first so that the reader can easily assess the size of the risk/dependency.
#4- Resources & Communication Box:
Identify who is in ‘ARCI’:
- ‘A’ is Accountable – This is one person, ‘the buck stops with them,’ and is the project owner. This person can only exist in this section, not in ‘Responsible’ as well.
- ‘R’ is Responsible – This is someone, or a group of people, that are the ‘doers.’ These people get the stuff done. Also include ‘(Key)’ next to one person, if appropriate, for responsible that is imperative to get things done,
e.g. Pete (Key). - ‘C’ is Consulted – Someone, or a group of people, that need to be consulted because they have an input that is valuable. Also include ‘(Key)’ next to one person, if appropriate, for consulted that is imperative to consult, e.g. Julie (Key) – ‘In the loop’.
- ‘I’ is informed and pertains to people that just need to be told what is going on (One-way communication).
This also doubles up as resources because in R the doers are listed. In this box, you would write:
- A – John
- R – Mike, Sue, and Kate
- C – Lisa
- I – The Marketing Department
Implementation Section of the Project Plan Template

In this second section of the project plan we call it ‘Implementation’ because having completed the title, owner, status, objectives, dates, and the 7 project foundation boxes, you are now ready to get started with what needs to be done.
#1- Phases Box:
On a separate piece of paper, break the project down into 7 large pieces. We call these phases. Type into these boxes the names of the 7 phases and begin with the month, e.g. ‘July – Investigate Gold Opportunities.’ You may use weeks instead of months if it is a shorter project. Remember, using the power of 3 words can help to keep the project simple.
#2- Milestones Box:
The Phases are chunks of the projects. Imagine groups of actions that will lead to achieving the phase. The milestone is the result you want from that phase. For example, a phase might be to ‘Analyse the xyz database,’ and the milestone is to, ‘Have identified 5 sales opportunities.’
#3- Actions Box:
- List the actions for the phase that you are in, e.g. ‘P1 – Get data from Bob for analysis.’
- Put the phase at the start of each action.
- Once phase 1’s milestone is complete remove the actions and replace them with the actions for phase 2.
- Actions are always written as what needs doing (the action), then who will do it and then when they will do it by (Action > Who > When).
#4- Ways of Working Box:
In this box, the objective is to share how the project team will work together. You may include:
- How often the project group will meet and how they will meet, e.g. face-to-face or via conference call.
- Share how the project plan will be stored, e.g. Dropbox, and how the project group will communicate with each other.
- Include how often you will communicate with the informed, and how.
Using the Project Plan
Once you have completed your first draft of the plan, get buy-in. Share it with your stakeholders. Get sign-off. Don’t wait until it is perfect. Your ‘child’ is born and you can now help it grow. If it stumbles, support and adjust.
The project plan template is designed to be scribbled on, updated, used, shared, and never become static. You should aim to update the project plan once per week. Have an up-to-date copy of your completed project with you at work that you can refer to.
A plan that is scribbled on as the plan changes lives and breathes. A plan that is perfect is only perfect on paper. Put the project plan template in a place that you will see every day, but not on the wall because people go ‘blind’ to what is on the wall. A diary is ideal if you look at that every day or a notebook.


